Sharon McCulloch is the CEO and Founder of FirstAidPro, Australia's leading Registered Training Organisation (31124), delivering First Aid Courses nationwide.
Sharon has 21+ years of experience as a qualified Emergency Care Nurse registered with the Australian Health Practitioner Regulation Agency (APHRA) and 12+ years as a First Aid Trainer.
She takes pride in FirstAidPro making first aid training available, comprehensive and affordable to everybody.
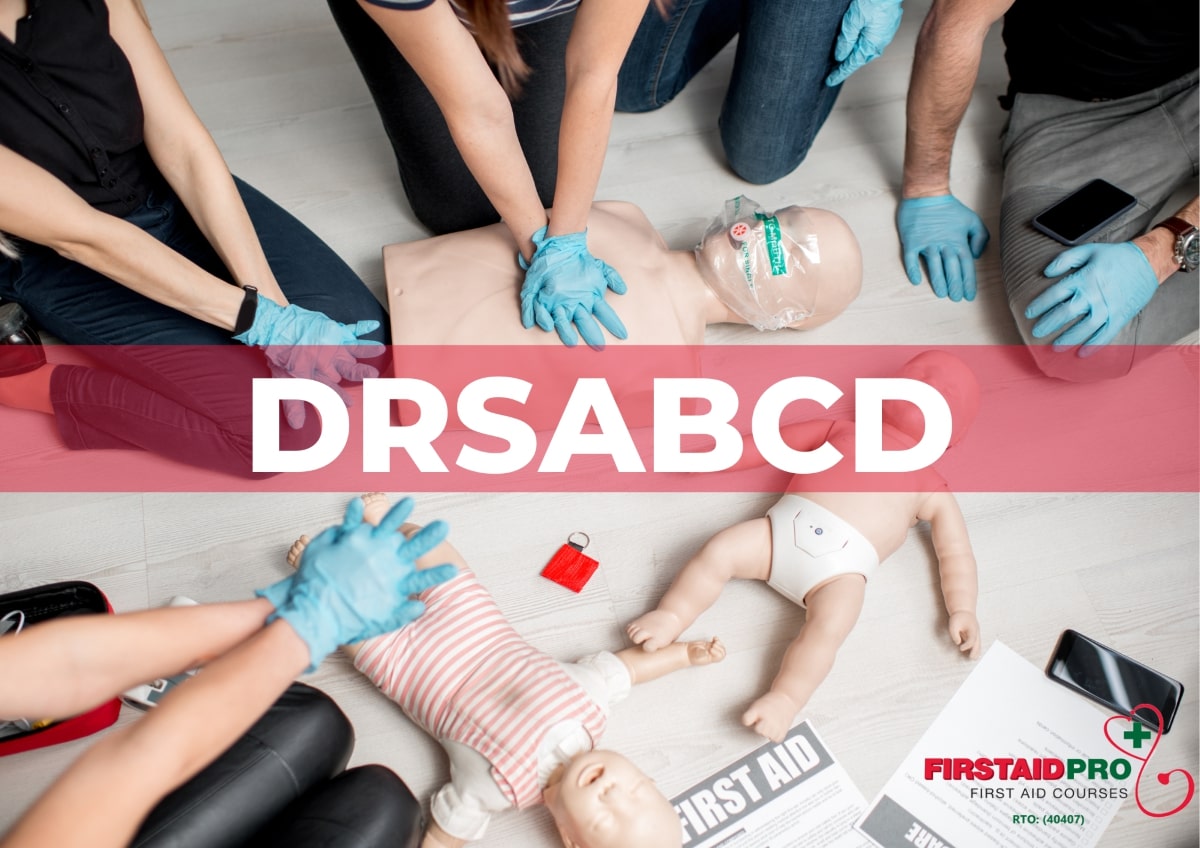
DRSABCD is an acronym used in first aid to guide providers when helping a sick or injured person.
It stands for Danger, Response, Send, Airway, Breathing, CPR, Defibrillation.
DRSABCD is not enough on its own; it serves as a reminder for the skills learned in first aid training.
It helps assess the situation, determine danger levels, and proceed with providing first aid.
Each letter represents a stage: Danger (checking for hazards), Response (assessing responsiveness), Send (calling for help), Airway (checking and clearing), Breathing (assessing and initiating CPR), CPR (performing compressions and rescue breaths), and Defibrillation (using an AED if available).
DRSABCD is covered in the First Aid Pro CPR course and hltaid011 “provide first aid” course.
DRSABCD is a common acronym that you’ll see in various places nowadays – especially in regards to emergencies, first aid, and CPR. At first glance, it doesn’t look like the most straightforward acronym to remember – or pronounce, for that matter. And yet, “DRSABCD” and “DRSABCD protocol” will often be dropped into workplace documentation or first aid information, often without further explanation.
If you’re new to that acronym, you’ll be pleased to know that it’s generally pronounced “Doctors ABCD” (as in “Doctors A, B, C & D”) rather than “Dris-Abb-Kuh-Duh” or something equally strange. But what does it mean? What on earth does DRSABCD stand for, and why is it important?
Where Can You Learn First Aid and CPR — And Who Can Join In?
If you’re ready to tackle DRSABCD like a pro, the good news is that it’s never been easier to learn first aid and CPR. Courses are available through reputable organisations such as First Aid Pro, Skills Training College and many others. These groups offer hands-on training that caters to everyone—from total beginners to those looking for a quick refresher.
There’s no minimum or maximum age when it comes to learning these life-saving skills. As long as you have the physical ability to perform CPR, you’re encouraged to get involved. Many schools even include CPR as part of their curriculum for students, ensuring younger Aussies get the knowledge early.
Remember: first aid and CPR are universal life skills. It truly doesn’t matter if you’re 15 or 75—knowing how to respond in an emergency can make all the difference. Even a little bit of confidence and basic training means you’ll be better prepared to help when it counts.
What Does DRSABCD Stand For?
DRSABCD is a series of steps to help walk someone through the first aid process. It describes the sequence of stages that a first aid provider should work through when encountering a sick or injured person. It guides them through gauging what danger they’re in, assessing whether resuscitation is needed and deciding how and when to start CPR.
Let’s break down the DRSABCD meaning:
DRSABCD stands for Danger, Response, Send, Airway, Breathing, CPR, Defibrillation. Each of these is a step – often quite a detailed step – that should be applied when providing first aid.
If you’re none the wiser for hearing that, don’t worry – the acronym is a reminder for a set of skills learned as part of first aid training. You’re not expected to look at those words and automatically know what to do. When you take part in an in person first aid course or online first aid course, the DRSABCD protocol is covered in detail, including when and how to apply each step. The acronym is just a reminder of that process and the skills that go with it.
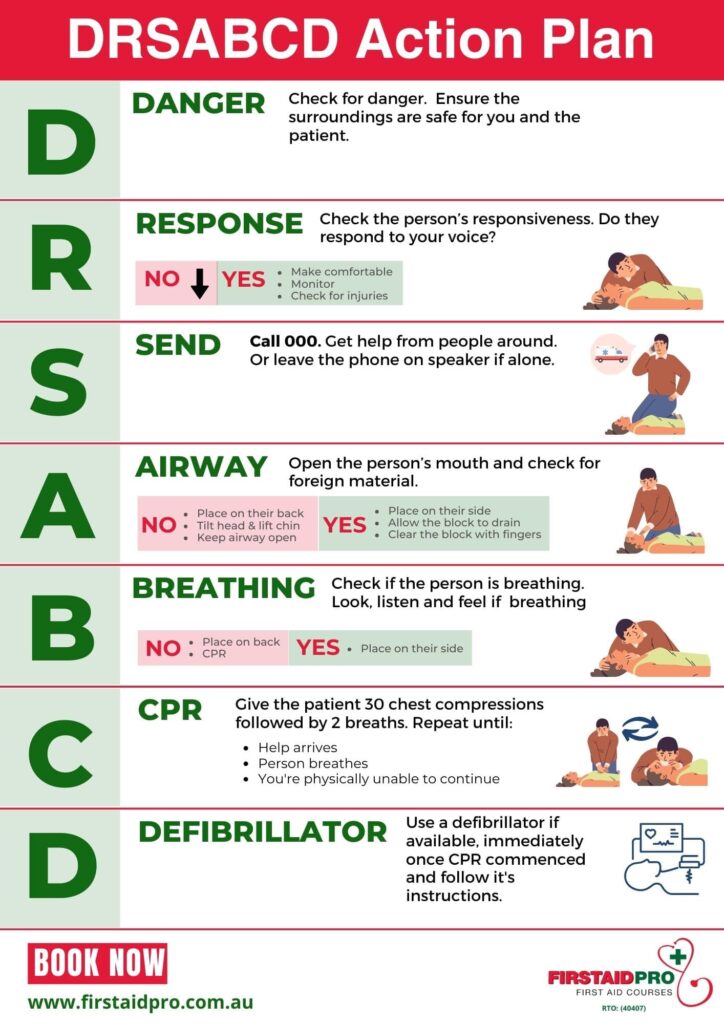
Below is the DRSABCD Action plan to guide you through these potentially life saving steps.
When is DRSABCD used?
DRSABCD is intended to be used at the very beginning of the first aid process. It’s for assessing the situation and the state of the injured or sick person to decide how to proceed with first aid. The initial step – “Danger” – involves checking the area for dangerous conditions, both to determine what might have harmed the person and to avoid falling victim to the same hazard. You can’t offer first aid to someone if you become a casualty yourself!
DRSABCD covers the initial steps of rendering first aid right up to rendering CPR and potentially using an automated defibrillator (AED). Because it’s primarily focused on resuscitation, it doesn’t really address other aspects of first aid – such as tending wounds for a conscious person or handing over to emergency services. Rather, it’s a tool specifically to help someone know what to do if someone is unconscious and in need of CPR or Defibrillation.
How to do DRSABCD
Each of the letters of DRSABCD is a stage in the process – either an assessment the first aid provider needs to make or a task they need to perform. Below we will break down the DRSABCD acronym and get a full understanding of what DRSABCD stands for:
Danger – The first step in the process is to check for danger. In many emergencies, there may be something in the area that has caused the sick or injured person to become a casualty, and the danger is still present. This could include live electricity, a fire, chemicals, falling heavy objects, or a dangerous animal such as a snake or dog. The first step is to remove that danger (or move the person away from it).
Response – The second step is to check the person’s responsiveness. Do they respond to your voice, and are they able to answer? There’s a big difference between first aid for a responsive, aware person and an unconscious one. This step often has its own mini-steps, including its own acronyms to remember – such as “COWS” (for “Can you hear me?”, “Open your eyes”, “What is your name?” and “Squeeze my hand”).
Send for help – Once you’ve made sure the area is safe, and you know if the person is conscious or responsive, it’s time to call for help. This might mean getting someone with you to call 000, or possibly making the call yourself if you’re alone. You can leave the phone on speaker mode as you continue with first aid – the 000 operators can advise you while help is on the way. If you don’t have a phone, you might need to be actually shouting for assistance. In the worst-case scenario where no help is in earshot, you may even need to roll the person onto their side (into the recovery position) and run to get help.
Airway – Open the person’s mouth and check for foreign material, such as bits of food or fluids (such as vomit). If there’s anything there, roll the person onto their side to allow fluid to drain out. If you can be confident of not making the problem worse, scoop any blockages out with a finger sweep (use gloves if possible). If their airway is clear, make sure they’re lying on their back, and then tilt their head gently back to open up their airway.
Breathing – Check if the person is breathing. Look for the rise and fall of the chest (you can also feel for this). Also, listen near their mouth for the sound of breath for at least 10 seconds. If they’re breathing, put them in the recovery position (on their side). If not, make sure 000 has been called and start CPR.
CPR – This is the stuff you’ve seen in all the movies – chest compressions and breaths blown into the person’s mouth. The current standard is 30 chest compressions and 2 breaths. Continue working until help arrives, the person starts breathing again, or you’re physically unable to keep going.
Defibrillate – If an automated defibrillator (or AED) is available nearby, it should be used as soon as possible once CPR has commenced. Modern defibrillators come with simple instructions (often spoken aloud by the unit) and are designed to be useable for untrained operators. They scan the patient and make all the hard decisions for you about whether to initiate a shock or not.
Although we can cover the basics of DRSABCD in this article, this is no substitute for learning how to apply DRSABCD and perform CPR in proper first aid training or even in remote locations implementing the HLTAID013 remote first aid course. First aid courses cover all these steps in detail, including common complications and how to respond to them. In particular, familiarity with an AED unit can save critical seconds in an emergency as a first aid provider comes to grips with how they operate.
The DRSABCD process is something that can save lives, and it’s worth investing a little time in learning how to do it properly.
What infection control measures should you take when performing CPR?
Infection control is a key consideration when performing CPR—especially when you’re dealing with blood, saliva, or any other bodily fluids. You don’t want to become an accidental patient yourself while trying to help someone in need! The good news is, there are practical steps you can take to keep both yourself and the casualty as safe as possible.
Use a resuscitation mask or face shield: These handy little devices (often called “CPR masks” or “mouth shields”) act as a barrier between you and the casualty, reducing the risk of cross-contamination. You can find compact versions that tuck into a wallet, purse, or the side pocket of your trusty first aid kit.
Wear gloves if available: Disposable nitrile or latex gloves (some first aid kits come stocked with these already) create a protective layer between your skin and any fluids you might encounter. Pop them on before you start first aid wherever possible.
Avoid direct contact with fluids: If you don’t have a mask or gloves, do your best to minimise contact with the casualty’s blood or saliva. This might mean prioritising hands-only CPR if you’re concerned.
Wash up thoroughly afterwards: Once help arrives and you’re done providing first aid, make sure to wash your hands with soap and water as soon as possible, and use hand sanitiser if you have it handy.
These precautions don’t just protect you—they also protect the person you’re helping from anything you might inadvertently transmit. While the risk is low, it’s always smart to stay on top of infection control during emergency care.
What steps should you take if you suspect a medication or drug overdose?
If you suspect that someone has taken too much medication or drugs—whether prescription, over-the-counter, or illicit—the situation can rapidly become life-threatening. It’s essential to act quickly and carefully. Here’s what to do:
Do not leave the person alone. While it might be tempting to think they can simply “sleep it off,” overdoses are very unpredictable and can become deadly with little warning. Always stay with the person until help arrives.
Call triple zero (000) immediately. Time counts. Let the dispatcher know why you’re calling and give as much specific information as possible—what substances were taken, how much, and when (if you know).
Monitor their responsiveness and breathing. If they’re drowsy or unconscious, try to wake them gently. If they are unresponsive or have trouble breathing, follow the DRSABCD action plan:
Danger: Ensure the area is safe for both of you.
Response: Try to get a reaction—call their name or gently squeeze their hand.
Send for help: You’ve already called 000, but ask anyone nearby to assist further.
Airway: If they’re unconscious, check and clear their airway.
Breathing: Look, listen, and feel for breathing.
CPR: If they’re not breathing, begin CPR (30 compressions to 2 breaths) until emergency services arrive.
Defibrillate: If an AED is available and the operator instructs you to use it, follow the voice prompts.
Gather information for paramedics. If possible, collect any medication bottles, packets, or substances nearby. These can help paramedics determine the best course of treatment.
Don’t try to induce vomiting or give them food or fluids unless instructed by the 000 operator. These methods can cause more harm than good.
Quick action can make all the difference. Even if you’re not sure what was taken or the person seems stable, getting medical professionals involved as soon as possible is the safest move.
Why is DRSABCD important?
When lives are in danger in a medical emergency, or even if you need to provide first aid for asthma attack, it’s not always easy to think clearly. It’s also easy to miss details and crucial steps in a process, or even suffer a mental blank, and simply not know what to do or how to start. A simple acronym like “Drs ABCD” can help you walk through the process and do each step at the right time. You don’t want to be halfway through attempting CPR and realise you’ve forgotten to call an ambulance, or check the area for live electrical wires.
Why do we use “DRSABCD”?
There’s a simple answer to that question and a more complicated answer. In simple terms, Drs ABCD or the DRSABCD action plan is a simple way to remember a lot of information. That simple set of 7 letters helps people quickly recall quite a detailed process.
Alternatively, you might be wondering why we use “Drs ABCD” and not something a little more catchy (such as “DREAMS” – for “Danger, Response, Emergency services, Airways, Manual CPR, Start defibrillation”, for example). If so, you might need the slightly more detailed answer, which is that the acronym has evolved over the years.
Back when CPR was first becoming commonplace, the acronym “ABC” (Airway, Breathing, CPR) was introduced basically as a way to remind people to only start CPR when a casualty’s airways were clear, but they definitely weren’t breathing. Initially, it was used most often in hospitals. However, over time it became clear that other steps were needed in the process.
The “Dr” (Danger, Response) was one of the first modifications to the ABC protocol, encouraging people to ensure their own safety before applying first aid and obtain consent where possible. This was more of a priority as members of the general public began using CPR at the site of an accident or injury. This was later revised to “Drs” to ensure people remembered to call 000 or otherwise send for help ASAP and that is why we use to call DRSABCD, DRABCD.
Also, as technology has evolved, automated defibrillators (AEDs) have become advanced enough for non-medical personnel to use and common enough that they’re frequently on-hand. As a result, “Drs ABC” has now become “Drs ABCD” to remind first aid providers that AEDs are both available and effective for a resuscitation situation.
As the acronym evolved, medical experts decided to leave the acronym as close to the original as possible to avoid confusing people in an emergency.
So although it might look hard to remember at first glance, DRSABCD – or “Drs ABCD” – is a valuable tool that has helped save many lives over the years.
What are the 7 stages of the DRSABCD action plan?
The DRSABCD action plan is a set of steps commonly followed during emergency situations, particularly in medical scenarios. While the term “DRSABCD” may vary depending on the region or organisation, I can provide you with a commonly used sequence of actions known as the “DRSABCD” approach:
Danger: Assess the situation for any potential danger to yourself, the victim, or bystanders. Ensure that it is safe to approach and provide assistance. If there are any hazards present, take appropriate measures to eliminate or minimize them.
Response: Check the victim’s responsiveness by gently shaking their shoulders and asking if they’re okay. If there is no response, shout for help and immediately activate the emergency medical services (EMS) or call for professional medical assistance.
Send for Help: Once you have determined that the victim is unresponsive, instruct someone nearby to call for an ambulance or emergency medical services (EMS). Clearly communicate the location and nature of the emergency.
Airway: Open the victim’s airway to ensure that it is clear and unobstructed. Tilt their head back gently while lifting the chin upward. This helps to align the airway and allows for effective breathing.
Breathing: Check for the victim’s breathing by observing their chest for rise and fall, listening for any sounds of breathing, and feeling for their breath on your cheek. If the victim is not breathing or only gasping, initiate rescue breathing or cardiopulmonary resuscitation (CPR) as necessary.
Circulation: Assess the victim’s circulation by checking for a pulse. If no pulse is detected, begin chest compressions to maintain blood circulation. Follow the appropriate guidelines for CPR based on your training and skill level.
Defibrillation and Early Advanced Care: If an automated external defibrillator (AED) is available, apply it as soon as possible. Follow the device’s instructions for attaching the pads and delivering a shock, if advised. Continue with advanced care techniques once professional medical assistance arrives.
Remember, the exact sequence and steps may vary depending on the specific guidelines or training you have received. It is always recommended to receive certified training in first aid and emergency response to ensure you have the most up-to-date knowledge and skills.
What Is The Rate Of Compressions For Drsabcd?
In Australia, the rate of compressions for the DRS ABCD approach, specifically during cardiopulmonary resuscitation (CPR), is consistent with the international guidelines.
The recommended compression rate in Australia, as in many other countries, is approximately 100 to 120 compression’s per minute. This translates to performing chest compression’s at a pace of roughly 2 compression’s per second.
It’s important to note that guidelines may be subject to updates and revisions over time. To ensure you have the most current and accurate information, it is recommended to refer to the official guidelines provided by the Australian Resuscitation Council (ARC) or consult with certified CPR training providers in Australia.
What Are The 10 Basic First Aid Procedures?
The 10 basic first aid procedures encompass a range of techniques and actions that can be applied in various emergency situations. Here are ten fundamental first aid procedures:
Assessing the scene: Before providing any aid, evaluate the scene for potential dangers to yourself and others. Ensure it is safe to approach and take appropriate precautions.
Checking responsiveness: Determine if the person is conscious and responsive by gently tapping their shoulder and asking if they are okay. If there is no response, shout for help.
Activating emergency services: If the situation requires immediate medical attention, call emergency services or instruct someone nearby to do so. Clearly communicate the location and nature of the emergency.
CPR (Cardiopulmonary Resuscitation): If the person is unresponsive and not breathing or only gasping, initiate CPR by performing chest compressions and rescue breathing. Follow the appropriate guidelines for CPR based on your training.
To perform CPR on an adult, ensure they are lying flat on their back. Place the heel of one hand in the centre of the chest and your other hand on top. Press down firmly and smoothly, compressing the chest to about one third of its depth, 30 times at a steady rhythm—aim for about 100 to 120 compressions per minute. After every 30 compressions, give two rescue breaths: gently tilt the person’s head back by lifting the chin, pinch their nostrils closed, seal your mouth over theirs, and blow firmly to make the chest rise. Continue this cycle of 30 compressions followed by two breaths until emergency help arrives or the person shows signs of recovery.
If the person is a child or an infant, similar principles apply, but the technique and force used should be adjusted according to their size. Consider seeking certified CPR training to learn these important variations.
Controlling bleeding: Apply direct pressure to the wound using a clean cloth or bandage. Elevate the injured limb if possible and maintain pressure until the bleeding stops or professional medical help arrives.
Treating burns: Cool the burn with cold running water for at least 10 minutes to relieve pain and prevent further damage. Cover the burn with a sterile non-stick dressing.
Managing fractures and sprains: Immobilize the injured area by creating a splint or using a support, such as a sling or bandage, to minimize movement. Apply ice to reduce swelling and elevate the injured limb if possible.
Dealing with choking: If a person is unable to speak, breathe, or cough due to a complete airway obstruction, perform the Heimlich maneuver (abdominal thrusts) to dislodge the object. Seek medical assistance if the obstruction persists.
Treating shock: Lay the person down and elevate their legs slightly to improve blood flow. Cover them with a blanket to maintain body temperature. Do not provide food or drink if they are experiencing severe injuries or trauma.
Administering basic first aid for injuries: Provide appropriate care for minor wounds, such as cleaning the wound, applying antiseptic, and covering it with a sterile dressing. Monitor for signs of infection and seek medical attention if necessary.
These are general guidelines, and it is crucial to receive proper first aid training and certification to gain a more comprehensive understanding of these procedures and adapt them to specific situations. If you would like to learn more about courses you could take see the First Aid Pro Course list.
Why Is Having a First Aid Kit Important, and What Should Be Inside?
Having a well-equipped first aid kit on hand is a critical part of being prepared for unexpected injuries or emergencies, whether at home, in the car, or at work. A properly stocked kit allows you to respond quickly to incidents—helping to stabilise injuries, control bleeding, or provide temporary care until professional help arrives. This immediate access to the right supplies can make all the difference in preventing minor injuries from becoming more serious and delivering peace of mind for everyone around.
When assembling your first aid kit, it’s important to cover a wide range of potential emergencies. The contents should be tailored to suit the environment and the number of people it’s intended to serve, but a general kit typically includes:
Adhesive bandages in various sizes
Sterile gauze pads and adhesive tape
Saline or antiseptic wipes for cleaning wounds
Scissors and tweezers
Disposable gloves
Triangular bandages and elastic wraps
Burn dressings or gel
Instant cold packs
A resuscitation mask or face shield
Safety pins and a notepad with pen
A basic first aid manual or instructions
It’s wise to regularly check that your kit is complete, that items haven’t expired, and that it’s easily accessible when needed. You might also consider specialty kits for workplace hazards, outdoor activities, or travel. Acquiring your kit is simple and can be done through reputable suppliers, local pharmacies, or safety equipment providers.
Having these supplies ready ensures you can act confidently in an emergency, whether it’s tending to a scraped knee at the playground or handling more serious incidents while waiting for medical professionals. Keeping your skills and your kit up to date are two of the most practical steps you can take to protect yourself and others.
The content on this website offers general insights regarding health conditions and potential treatments. It is not intended as, and should not be construed as, medical advice. If you are facing a medical emergency, dial 000 immediately and follow the guidance provided.
Every year on 15 July, World Youth Skills Day highlights the importance of equipping young people with the knowledge, capabilities, and confidence needed to succeed …
When medical emergencies happen, paramedics are often the first healthcare professionals on the scene. International Paramedics Day recognises the skill, dedication, compassion, and clinical expertise …
Getting your White Card is the first step onto any Australian construction site—but figuring out whether you can complete the course from your couch depends …