CPR is not just for adults. Children and infants can also experience cardiac arrest, and knowing how to perform CPR on them can be crucial in an emergency situation. In fact, the steps for performing CPR on children and infants are slightly different from those for adults, so it’s important to learn the proper techniques for each age group.
Learning baby CPR can help parents recognise signs of distress in their child and act quickly to prevent further harm. It’s important to note that CPR should be performed by someone who’s been trained in the first aid technique beforehand, if such a person is present.
By taking a Childcare First Aid Course and learning the proper techniques for chest compressions and rescue breaths, parents can ensure that they’re equipped with the knowledge and skills necessary to save their child’s life in an emergency.
Knowing baby CPR can also be helpful for babysitters, grandparents and other caregivers who may be responsible for a child’s safety.
Cardiopulmonary Resuscitation (CPR) is a medical technique used to save someone’s life when their heart, breathing or both have stopped and can circulate blood to help keep the person alive until medical professionals arrive to provide further treatment.
It involves pressing down on the chest and giving rescue breaths to manually stimulate breathing normally and blood circulation to keep the brain and vital organs oxygenated.
Anyone can start CPR, but it is important to learn the correct technique to ensure the best chance of success. It’s a vital skill that can make a difference in saving someone’s life.
You can also follow our step-by-step guide!


Before you start CPR for babies, it’s important to check for any potential danger in the surrounding area, which includes making sure the area is safe for both the person in need of CPR and the person performing it.
This means looking for any hazards like electrical wires, sharp objects, or unstable surfaces and if there is any danger present, move the infant to a safe location before beginning. It’s crucial to prioritise safety to prevent any further harm or injury to both the infant in need of CPR and the rescuer.
Is the breathing struggling, weak, erratic or stopped completely?
Tap the baby’s foot, shout their name, and watch for a response.
For children over 12 months, tap them on the shoulder, while also shouting their name and watching for any kind of response.
If the cause of the baby’s breathing difficulty isn’t obvious, take a moment to look into their mouth to see if anything is blocking their throat.
If you can see there is a blockage in the baby’s mouth or nose, gently remove it using your fingers or a suction bulb, if any are available. Be careful not to push the blockage further into the baby’s airway.
For fluids, gently tilting the baby onto its side can help with draining it from the airway.
It’s important to check for other signs of life, even breathing sounds or a pulse or heartbeat.
If you are trained in CPR, you can perform a quick assessment of the person’s pulse and breathing. It’s also important to note any changes in skin colour or temperature, as these can be indicators of shock or other medical emergencies.
Also assess for any other life-threatening injuries or conditions, including bleeding.
Do not spend more than 10 seconds on this and checking the mouth and nose, spend only the absolute minimum time assessing the condition to avoid delaying the administration of CPR.
Given the fragile nature of infant bodies, there are crucial differences between chest compressions for them and chest movements for adults that must be observed to prevent further harm to the baby.
There are two methods for administering CPR compressions to a baby, both start with standing or kneeling to the side of the baby. This can be performed with the baby on a table or any other raised surface that is stable and can support the force of compressions.
For a child’s chest, it’s best to place them on the floor and kneel beside them.
Method one, the two-finger technique:
First, lay the baby on a firm, flat surface without tilting the head back. We keep the head in as close to a neutral position as possible because the trachea (windpipe) in babies is still comparatively soft, so excessive tilting of their chins or heads can bend and misshape it.
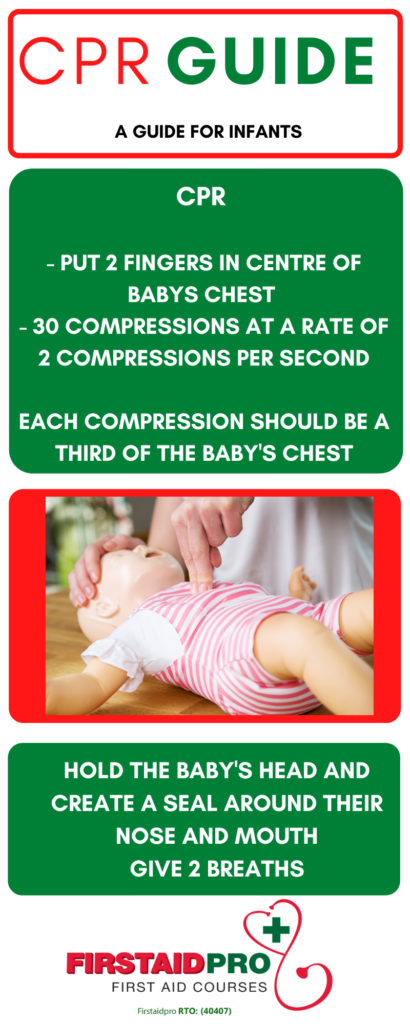
In the centre of the chest, find the bottom half of the sternum (breastbone) and place just 2 fingers over it.
With those 2 fingers, press down with just enough force to compress the infant’s chest by one-third of its depth. This is to ensure your compressions reach deep enough to stimulate the heart, but not too deep that you risk further injury.
Release the pressure immediately after, completing a single compression, getting ready to follow with a further 29 to complete 30 compressions total.
Method two, the two thumbs technique:
Instead of placing two fingers on the sternum, place both thumbs, with the rest of your fingers encircling the baby’s chest towards the back to provide additional support.
With the hands in this position, press down to compress the chest by one-third.
Release the pressure immediately after, allowing blood to re-enter the heart before compressing again.
Follow-up with a further 29 compressions.
For a small child, the technique applied differs again, since their bodies are more developed but less than a mid-sized child, teen or adult for which the standard CPR protocol can apply.
For a small child, the one-handed technique should be used:
This technique starts off the same way as normal CPR by finding the centre of the chest and placing the heel of your dominant hand upon it.
Where it diverges in consideration of a small child’s body is that instead of placing a second hand on top, we simply use the one hand, as indicated in the name of the technique.
Keep this arm straight, and begin pushing down hard and fast, compressing the chest by one-third.
Release pressure, allow the ventricles (heart chambers) to refill, and follow up with 29 more repetitions of this movement.
The speed for these compressions should be approximately 100 to 120 beats per minute. A useful way to remember this is to match the tempo of the song Stayin’ Alive by the Bee Gees, but Don’t Stop by Fleetwood Mac and I Will Survive by Gloria Gaynor, among many others, also work.
After completing 30 compressions, it is best practice to administer two rescue breaths. This is the 30:2 rule: 30 compressions followed by two breaths.
For babies under 12 months of age, you must do it carefully to maintain as near a neutral position as possible, without tipping the head far forward or far backward. Instead, support the lower jaw with the mouth open, bringing the infant’s tongue away from the back of the throat. Avoid putting any pressure on the neck of the soft skin under the chin and, with a hand on the forehead, gently tip the infant’s head back very slightly.
Take a breath, then open your mouth and form a seal over both the nose and mouth of the baby, so that air blown in through the mouth doesn’t escape through the nose, defeating the point of the exercise.
Slowly and steadily blow enough air until you observe the infant’s chest rising, stopping to allow the chest to fall.
Repeat a second time, watching for the rise and fall of the chest, before recommending another set of 30 compressions.
You should continue with administering 30 compressions followed by two breaths until the infant resumes breathing normally, someone else is ready to take over compressions or emergency services arrive.
AEDs are incredibly useful devices that can significantly improve outcomes for cases where the heart stops (cardiac arrest) due to heartbeat irregularities (arrhythmias). Different from a heart attack, where blood flow to the heart gets blocked, irregular heartbeats can be effectively treated by administering an electrical current that corrects the malfunctioning organ.
Because AEDs can only correct an irregular heartbeat, there needs to still be existing electrical signals within the heart. As such, a heart that has ceased all electrical activity, called asystole, cannot be treated with an AED. Note that an asystole heart can still be treated with CPR.
Whether a heart’s rhythm is shockable might seem out of the understanding of even trained first-aiders, but AEDs have been designed for use by anyone. They have built-in technology that can detect whether a particular rhythm is shockable, to provide accurate guidance for the process.
In many circumstances, AED may not be necessary and CPR will often be relied upon until emergency services take over or until the heart produces an electrical signal the AED machine can correct. There are also many circumstances where an AED is not accessible, or there will be some delay while it is being retrieved or while it is being readied for use.
Remember that even with an AED you will need to continue to give baby CPR as per the AED’s instructions. These are the circumstances that first aid training will train you for, as any CPR is better than none and every second can count when someone, especially a baby, has ceased breathing properly.
If you have access to an AED, have called 000, are speaking with the operator and have been advised to use it, follow the operator and the device’s instructions for the best chance of success.
People can learn CPR in an online course, however, the most beneficial experience is where you can practise the correct amount of force for compressions, learning tips and tricks from trained professionals in a practical setting.
Attending a course from a registered training organisation is not only equipping yourself with a life-saving skill, but it can also be a flattering addition to any resume.
Knowing how to perform CPR on babies is a valuable skill that can save little lives, even if you only ever have to perform it once in your entire lifetime.
By taking a CPR class and staying up-to-date on the latest techniques, you can be prepared to help someone in need and potentially make a life-saving difference, if ever the need arises.
We make sure to keep the baby or child’s mouth and head in a position to avoid bending or misshaping their trachea (windpipe). This is because the trachea is still soft in babies, and excessive tilting of their chins or heads can be dangerous.
Keep their head in a position close to neutral, avoiding excessive tilting forward or backward. Instead, open their mouth and support the lower jaw to move the baby’s tongue away from the throat. Be careful not to apply pressure on the neck or the soft skin under the chin. With one hand on the forehead, gently tilt the baby’s head back just a little bit.
The way to give compressions and breaths to babies is the same as for adults and kids. If there is only one person helping, they should do 30 compressions and 1 breath. If there are two people helping, they should each do 15 compressions and 2 breaths.
When it comes to learning baby first aid, there are several first aid classes available that can equip you with the necessary skills and knowledge to handle emergency situations involving infants. These classes can be done online but as with any first aid skills it is recommended that you choose a registered training organisation that delivers nationally accredited certifications with an emphasis on practical learning. Practical learning is crucial for first aid to get the best chance of practising CPR for babies including the correct chin lift position, chest depth for compressions and the recovery position.